Tuesday, October 6, 2009

Website Launch Open House and You're Invited!

Have you've ever wanted a personal, behind the scenes look at where and how art is restored? Come to our Open House!


We're excited about the launch of our new website and we're in the mood to celebrate! Come on by after work and get a tour of our lab, see samples of our work and art restoration in progress! Most importantly, relax with a bite of food, a glass of wine and stimulating conversation!

Graphic Conservation Fall Open House

  • WHEN: Thursday, October 29th 6 pm - 9 pm
  • WHERE: Our Lab, 329 w. 18th St. Suite 701 Chicago Need directions? Click here!
  • Our Location is easily accessible from 90/94 from the 18th st/Canalport exit
  • Free indoor parking available in our garage.
  • Wine and Hors d'Ĺ“uvre's
If you have any items you'd like to have us look at, bring it along for a free condition report and examination.

Please RSVP via email by Tuesday, October 27th.

We hope to see you all there!

Tuesday, September 29, 2009

Awesome Before/After Pics: Our New Website Makeover


We are excited to announce the launch of the new and improved GraphicConservation.com. Dynamic new features paired with new educational pages help make GraphicConservation.com a premier reference tool in the online world of Art Conservation.

Nothing is immune to the erosion of time and times certainly have changed since Graphic Conservation went online in 1999. Thankfully our bodies don't age as quickly as digital media, where a ten year span can make the latest cutting edge look like it came out of the ice age. With only a few sparse updates over the past ten years, our old website was definitely looking Jurassic. We've spent the last few weeks focusing our skills at "arresting deterioration and repairing damage" to bring our homepage into the new millennium!


We are excited to announce the massive makeover to our website is complete! Dynamic new features and educational pages for our image driven site include:
We do so love our before/after pics. Click here to get the effect: Before and After.

Wednesday, August 26, 2009

Hurricane Katrina Restoration Remembered: Drysdale Painting

For the past week or two, we've been going through years of before and after treatment photographs as part of the huge project of updating our website (which we hope to have complete by our next monthly blog post). While sorting photos, I came upon these images of a treatment we performed on painting by Alexander J. Drysdale which was severely water damaged during Hurricane Katrina.


Before (left), during (middle) and after (right) treatment images of an A. J. Drysdale painting from New Orleans.

This week marks the fourth year anniversary since that horrific time, so we thought we would profile this treatment in remembrance of the cataclysmic events which caused so much ruin and to pay homage to the massive rescue efforts which brought our nation together.

This oil painting was done on an artist's board somewhere around the earlier part of the last century. As you can see, the painting before treatment (below) shows a great amount of damage. There are many losses to the image area especially along the upper and lower edges. The artwork has a lot of wavyness and dirt and mold damage due to water damage from the hurricane flooding.


Artist boards of this type were made with layers of brown wood pulp board plied together and then covered with a thin white paper as a cover. The plies (thin layers) were glued together to form one layer. However, due to the water damage, the thin paper containing the painted image was separating from the backing board in many places. Because the wood pulp board was poor quality anyway, it was necessary to remove the paper from the wood board. This however, was a very very scary prospect. The paper was incredibly delicate, thin and brittle. Imagine trying to remove the the printed image from a modern box of cereal free of the brown cardboard fibers and without causing a lot of damage to image area.


The painting after being mounted to Japaense tissue (left) and the complete treatment with inpainting (right).

It was a very tense treatment, but we were successfully able to separate the paper and safely stabilized by mounting it onto a Japanese tissue backing using wheat starch paste. The mud on the surface of the painting was delicately removed, and losses were filled and inpainted. This painting represented a wonderful success story, and we were proud to be a small part of the huge restoration effort in the aftermath of Hurricane Katrina

Thursday, July 30, 2009

Restored T206 Honus Wagner Card Up For Auction!

For anyone who knows anything about Baseball ephemera, the T206 Honus Wagner card is the the holy grail, the Mona Lisa, the Bugatti Royale of baseball cards. To claim one in your collection is the absolute, ultimate high of any baseball collector.


But unlike the Mona Lisa, it may just be possible to own a T206 Wagner card without a black face mask or a fast getaway car. Check out this video where Doug Allen, of Legendary Auctions is making this possible with an authentic Wagner card which has been restored to its previous glory.

I wonder who did the work? Got any guesses?

And if you're left still wanting more info, read about the card's history on its lot detail.
_____________________________________________________________

**UPDATE 8/11/09: On August 7th, the restored Honus Wagner Card sold at Auction for $220,000. That's quite a few clams!

Saturday, June 13, 2009

Ask the Conservator: Damaged Die Cut Ad Displays


Example of a WWI era Board Advertisement display before treatment (left) and after treatment (right).

A recent question, received from one of our readers, involves how to deal with damaged die cut billboard advertisement displays. The reader described their display piece as being water damaged with warping in the board and large losses in the corners. They asked:
"Is it better to remove the printed paper from the damaged board? What is the best way to go about stabilizing it? Can the water damage and the missing corners be fixed?"

Example of die cut ad display with unique shape circa 1930. Image courtesy of SportsAntiques.com

Die cut ad displays are a common form of ephemera we see all the time. These items were printed on a facing paper which was adhered overall to a board (generally poor quality). Often, they were die cut in a unique shape suitable to be propped up near the product to be used as a promotional tool such as the example directly above of a Bradley Sweaters Ad circa 1930.

Because the boards were generally of a poor quality, these items are very susceptible to damage such as staining and warping due to water damage, and losses and tears throughout the board and facing paper, which you can see present in the example below.


Example of water damaged board with staining, warping, tears, losses, and separations in paper from board.

Although the treatment of items like these can be difficult and time consuming, it is possible for them to be stabilized and restored to much of their previous glory. To answer the question of how this is done, we'll separate the question into two issues: Stabilizing the item and filling any losses.

To stabilize the item, we don't suggest taking the paper off the board, like we would for regular items which have been mounted to board due to previous poor framing techniques. In die cut ads like this, the board is a necessary part of the character of the piece. Although I am not a professional appraiser, I would also imagine it would take away from the item's monetary value. Instead we suggest leaving the board item intact and focusing the treatment on only the areas of damage.

We would suggest stabilizing the item by a series of treatments starting off with general surface cleaning. We would then attempt to re-adhere the separating paper and board layers using archival wheat starch paste. If possible, we would also attempt to reduce the dark linear staining due to water damage locally, meaning focused in the areas of damage. Due to the nature of the board, the treatment for reducing disfiguring staining is very limited on items like this, although we've had much success in substantially reducing them. We would then try to flatten the board overall to reduce the warping.


Example of die cut ad with large fragment and losses in lower left corner of board.

To answer the next question, it is possible to repair the board and fill any missing areas. In steps similar to re-adhering areas of separating paper and board issues, we would reattach any sections which have broken off by reattaching the fragment to the board with plies of Japanese tissue and wheat starch paste, possibly also using a cellulose powder.


Photos mounted to board are also a good candidate for this kind of treatment like these examples of before and after treatment images of this turn of the century sports photo.

Losses can be filled using a matching antique board. We have a large collection of antique board and papers in our lab which can be used to match to the original board and facing paper by weight, thickness and texture. When we find a matching board and facing paper, they will be adhered together, and then cut and shaped to fit the missing area. The board fill will be placed as seamlessly as possible into the missing area using the same techniques we used for repairing fragments. Fills can then be inpainted to blend in with the surrounding area.

Items like these, although very challenging can be some of the most rewarding treatments because they often yield stunning results as you can see in the before and after treatment pictures above. Click here to see more exciting before and after treatment images from our various projects!
_____________________________

If you have any questions you'd like to be featured in our Ask the Conservator series, please email us with "Ask the Conservator" in the subject line.

Thursday, May 14, 2009

An Honest Sell


We're celebrating the 200th anniversary of Lincoln's birth with new postcards featuring the man himself. These before and after images show drawings of Lincoln by the Louis Tiffany studios used for planning the stained glass windows for the Levere Memorial Temple on the Northwestern University Campus. Click here for more images from the collection of 68 drawings as well as treatment information on preserving these beautiful drawings for future generations.


Visit our website for more information on our company.

Monday, April 13, 2009

Saving Tiffany: The Challenge of Restoring A Collection of Tiffany Studio Sketches


In April of 2004, a box of tightly rolled drawings, covered with layers of dust and dirt were delivered to our lab. The bottom of the filthy box was teeming with numerous fragments from who knows how many rolls. The drawings were so brittle, they couldn't be unrolled without causing severe damage. They were so messy, severely damaged and so incredibly delicate, we couldn't help wondering "can these things even be saved"?

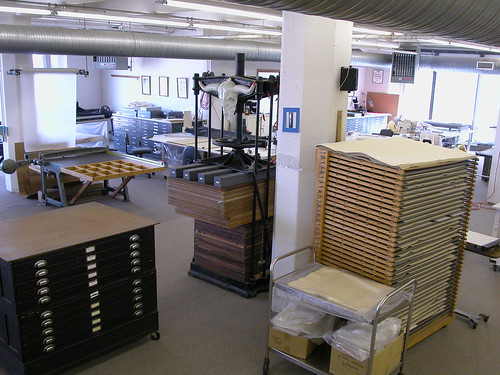
The original box (on left) of rolled drawings

The answer had to be yes, because this beat up cardboard box contained original hand drawn designs for a one of the last series of stained glass windows produced by the Louis Tiffany Studios, before they closed their doors in 1932. These windows are the focal point of the Peace Chapel in the Levere Memorial Temple, which stands as the headquarters of the Sigma Alpha Epsilon Foundation, the largest collegiate fraternity. This grimy box of drawings complete with the original Tiffany label still attached was finally dug out of the Sigma archives where it had been stored since the Temple's construction in 1930. It was clear, these items were in desperate need of repair.


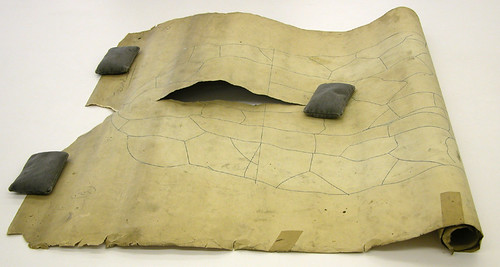
Back of one drawing unrolled as much as possible and weighted down. Tears and old tape are visible above.

Because we could not attempt unrolling them without causing damage, we were unable to perform our customary examination or treatment proposal. Our initial reports had to be made based solely on what could be examined from the exterior of the rolls, which itself was far from promising. In addition to the extensive surface dirt and brittleness, the drawings contained large tears running the width of the rolls, horizontally as well as vertically. Some old repairs had been made with a variety of poor quality tapes only adding to the overall damage and fragile state of the cartoons. We couldn't even begin to guess which drawings the hundreds of fragments matched up with. It was apparent the items would need an initial first stage of treatment before they could even be assessed.

First, we needed to gently humidify the paper in order to carefully unroll and lightly flatten the drawings to determine further treatment options. The drawings were still so dirty, they needed to have the surface dirt reduced in a series of dry cleaning treatments before they could be digitally photographed for an inventory. There were so many paper fragments, we were still unable to come up with an exact number of cartoons at the end of stage one.


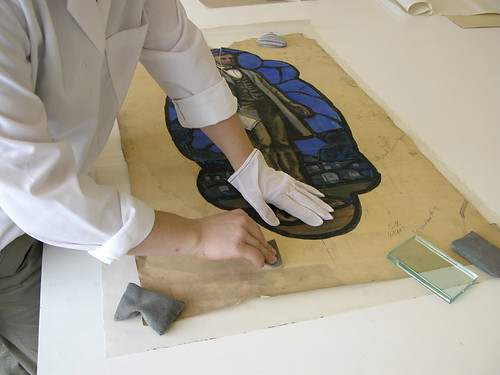
A conservator surface cleaning with a dry cleaning sponge.

It was necessary for us to examine and test the brittle cartoons to determine the second stage of treatment. Wet treatments would strengthen the paper, but presented too much risk to the delicate painted colors which tested sensitive and soluble to water. To complicate matters, areas of this delicate paint were also beginning to crack and flake which was further aggravated by even light handling.


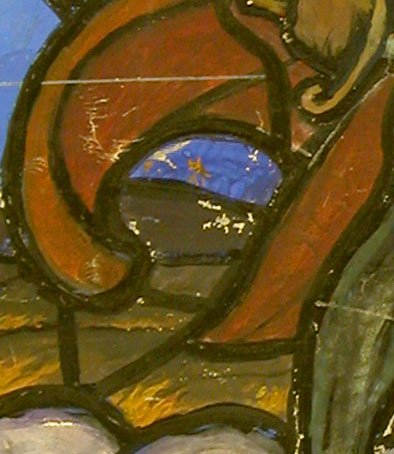
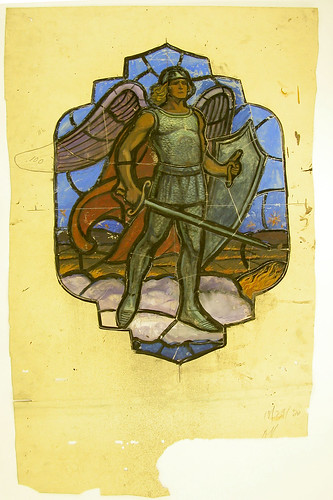
This detail of an angel drawing (full image before treatment on right) demonstrates the flaking media.

The original artists had also applied many layers of paper collage elements to the paper using very liberal amounts of what appeared to be animal hide glue. The glued collage elements were creating a pull on the paper, causing further stress and leading to tears and losses in the brittle wood pulp paper, a poor quality material to begin with which was used mainly for sketching. Originally, these drawings were only made as reference materials, with no intention of permanence.

Even the light handling of these delicate items for examination created further damage. From every direction we were faced with serious obstacles. We knew the treatment was necessary as well as nightmarish. Did we stop when presented with a challenge of this magnitude. NO!!! The gauntlet had been laid. We were itching to move forward just needing the go ahead from the client.


Drawings awaiting funding to complete stage 2 of treatment.

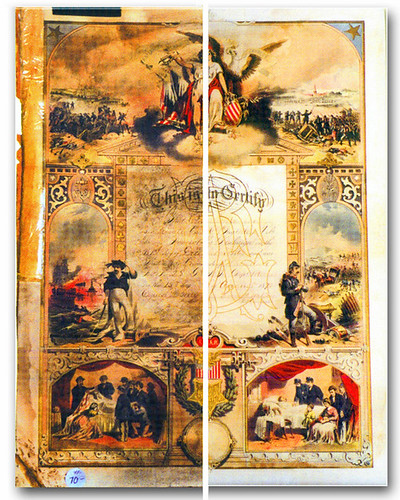
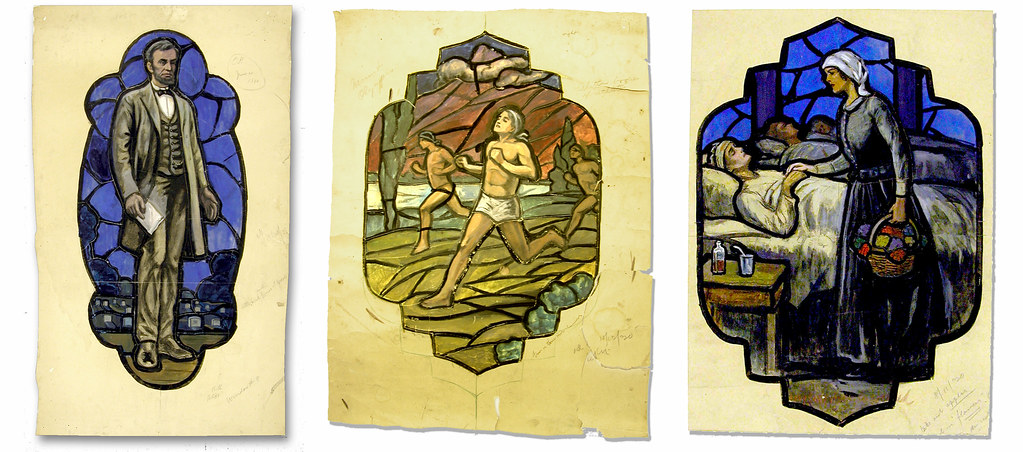
The project was in need of donations from members of Sigma Alpha Epsilon to move forward. To help energize fund raising efforts, we chose a single cartoon to put through the full treatments we had proposed for the group and document the process in detail. The cartoon selected for this treatment was the very iconic image of everyone's favorite president, Abraham Lincoln!


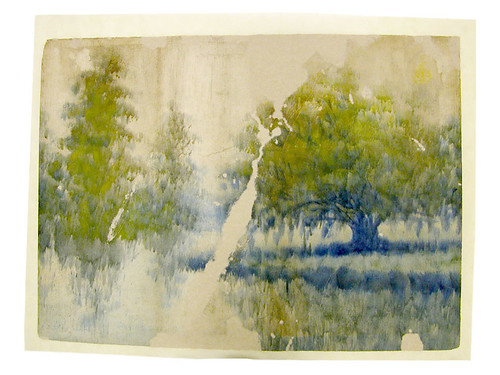
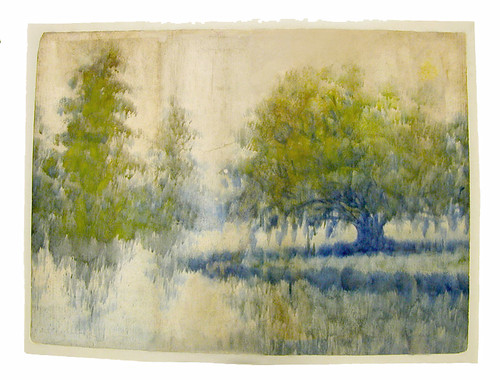
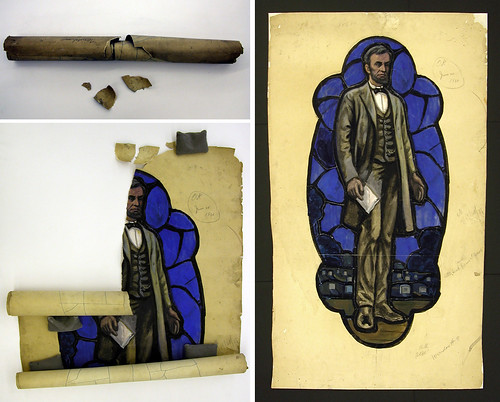
The two images on the left show the before images with the after image on the right.

The Abraham Lincoln drawing was further cleaned and all old repairs were removed. Tears were painstakingly repaired using Japanese tissue and starch paste adhesive. Losses in the paper were filled with a heavy weight Japanese tissue. The cartoon was again placed into a humidity chamber to relax before being gently flattened between wool felts. Design losses were inpainted by hand to match the surrounding areas. The Lincoln cartoon was matted with 100% buffered rag board and placed behind UV filtering plexi glass in preparation for being placed into a frame for display.


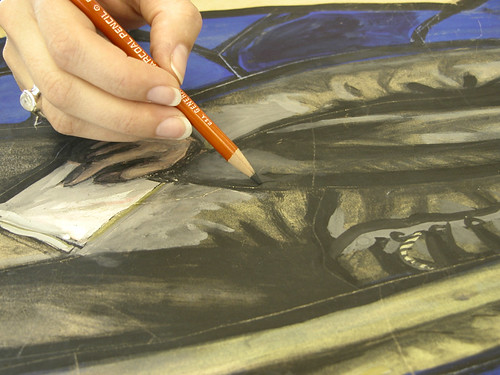
Media losses on the Lincoln drawing being filled with removable media.

The results were absolutely stunning. Over the next two years, the foundation was able to raise tens of thousands of dollars thanks in part to the persuasive efforts of Honest Abe on generous benefactors. The treatment for the remaining 68 cartoons was completed by the end of 2006.


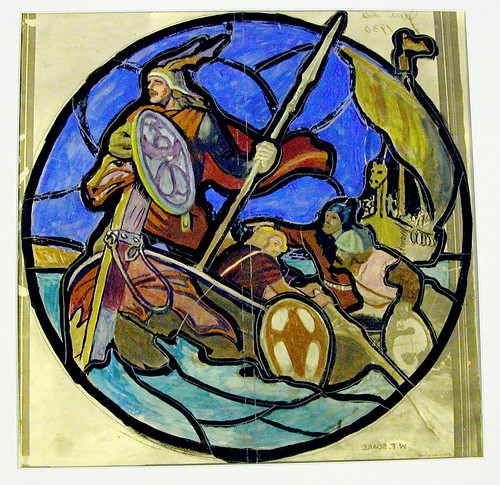
After treatment of drawing of Vikings.

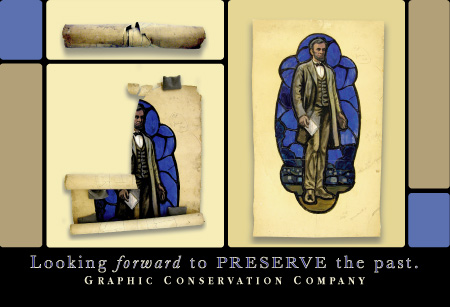
Back in 2004, when the many rolls of severely damaged paper arrived at our facility, it was unclear if the items could even be saved. It was miraculous and rewarding to see the project go from conception to completion These cartoons are now preserved to aid future generations in gaining a key insight into the execution of this wonderful and important collection of Tiffany stained glass windows.