Saturday, June 13, 2009

Ask the Conservator: Damaged Die Cut Ad Displays


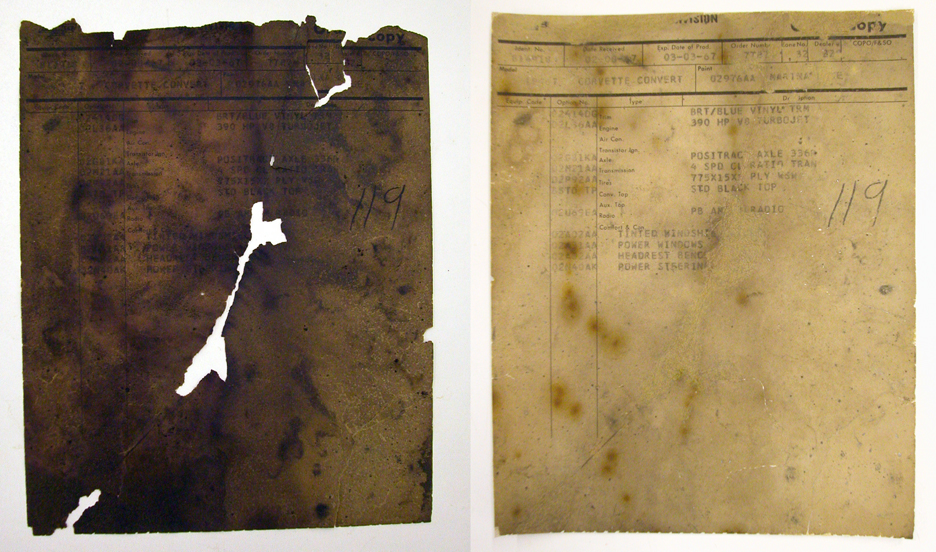
Example of a WWI era Board Advertisement display before treatment (left) and after treatment (right).

A recent question, received from one of our readers, involves how to deal with damaged die cut billboard advertisement displays. The reader described their display piece as being water damaged with warping in the board and large losses in the corners. They asked:
"Is it better to remove the printed paper from the damaged board? What is the best way to go about stabilizing it? Can the water damage and the missing corners be fixed?"
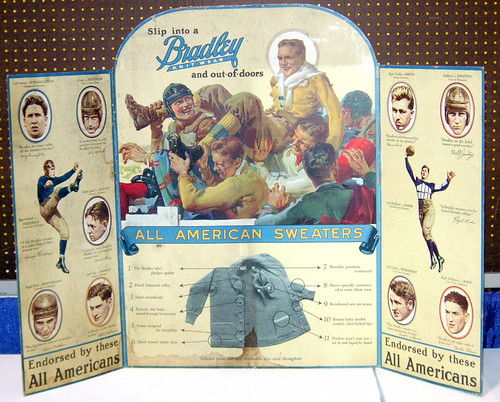
Example of die cut ad display with unique shape circa 1930. Image courtesy of SportsAntiques.com

Die cut ad displays are a common form of ephemera we see all the time. These items were printed on a facing paper which was adhered overall to a board (generally poor quality). Often, they were die cut in a unique shape suitable to be propped up near the product to be used as a promotional tool such as the example directly above of a Bradley Sweaters Ad circa 1930.

Because the boards were generally of a poor quality, these items are very susceptible to damage such as staining and warping due to water damage, and losses and tears throughout the board and facing paper, which you can see present in the example below.
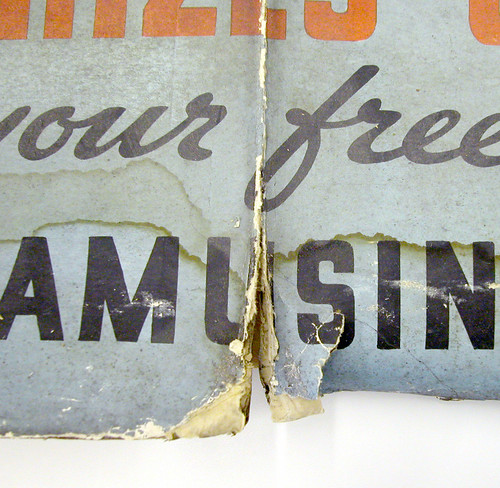

Example of water damaged board with staining, warping, tears, losses, and separations in paper from board.

Although the treatment of items like these can be difficult and time consuming, it is possible for them to be stabilized and restored to much of their previous glory. To answer the question of how this is done, we'll separate the question into two issues: Stabilizing the item and filling any losses.

To stabilize the item, we don't suggest taking the paper off the board, like we would for regular items which have been mounted to board due to previous poor framing techniques. In die cut ads like this, the board is a necessary part of the character of the piece. Although I am not a professional appraiser, I would also imagine it would take away from the item's monetary value. Instead we suggest leaving the board item intact and focusing the treatment on only the areas of damage.

We would suggest stabilizing the item by a series of treatments starting off with general surface cleaning. We would then attempt to re-adhere the separating paper and board layers using archival wheat starch paste. If possible, we would also attempt to reduce the dark linear staining due to water damage locally, meaning focused in the areas of damage. Due to the nature of the board, the treatment for reducing disfiguring staining is very limited on items like this, although we've had much success in substantially reducing them. We would then try to flatten the board overall to reduce the warping.


Example of die cut ad with large fragment and losses in lower left corner of board.

To answer the next question, it is possible to repair the board and fill any missing areas. In steps similar to re-adhering areas of separating paper and board issues, we would reattach any sections which have broken off by reattaching the fragment to the board with plies of Japanese tissue and wheat starch paste, possibly also using a cellulose powder.
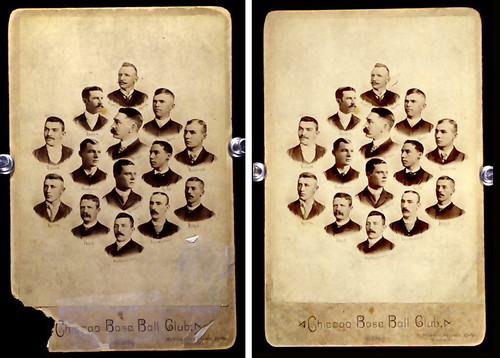

Photos mounted to board are also a good candidate for this kind of treatment like these examples of before and after treatment images of this turn of the century sports photo.

Losses can be filled using a matching antique board. We have a large collection of antique board and papers in our lab which can be used to match to the original board and facing paper by weight, thickness and texture. When we find a matching board and facing paper, they will be adhered together, and then cut and shaped to fit the missing area. The board fill will be placed as seamlessly as possible into the missing area using the same techniques we used for repairing fragments. Fills can then be inpainted to blend in with the surrounding area.

Items like these, although very challenging can be some of the most rewarding treatments because they often yield stunning results as you can see in the before and after treatment pictures above. Click here to see more exciting before and after treatment images from our various projects!
_____________________________

If you have any questions you'd like to be featured in our Ask the Conservator series, please email us with "Ask the Conservator" in the subject line.

Thursday, May 14, 2009

An Honest Sell


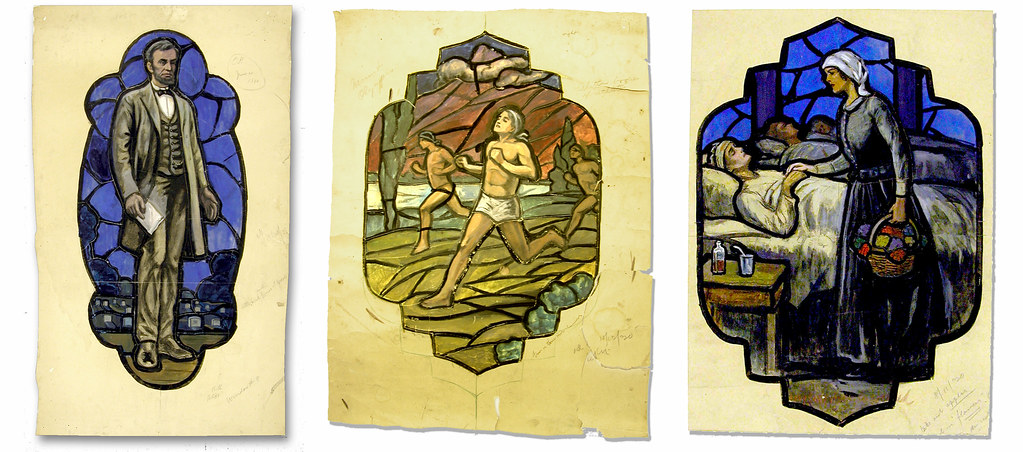
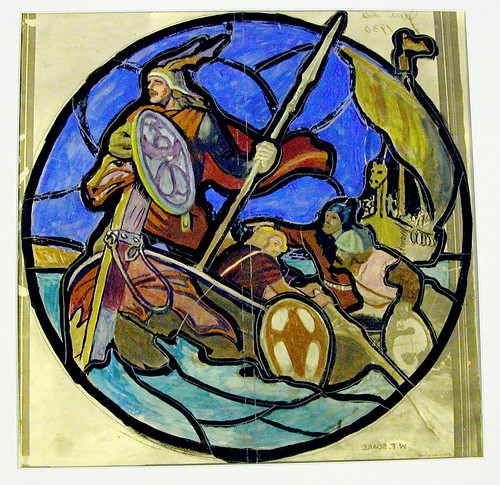
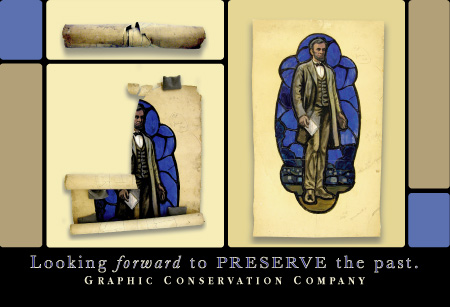
We're celebrating the 200th anniversary of Lincoln's birth with new postcards featuring the man himself. These before and after images show drawings of Lincoln by the Louis Tiffany studios used for planning the stained glass windows for the Levere Memorial Temple on the Northwestern University Campus. Click here for more images from the collection of 68 drawings as well as treatment information on preserving these beautiful drawings for future generations.


Visit our website for more information on our company.

Monday, April 13, 2009

Saving Tiffany: The Challenge of Restoring A Collection of Tiffany Studio Sketches


In April of 2004, a box of tightly rolled drawings, covered with layers of dust and dirt were delivered to our lab. The bottom of the filthy box was teeming with numerous fragments from who knows how many rolls. The drawings were so brittle, they couldn't be unrolled without causing severe damage. They were so messy, severely damaged and so incredibly delicate, we couldn't help wondering "can these things even be saved"?

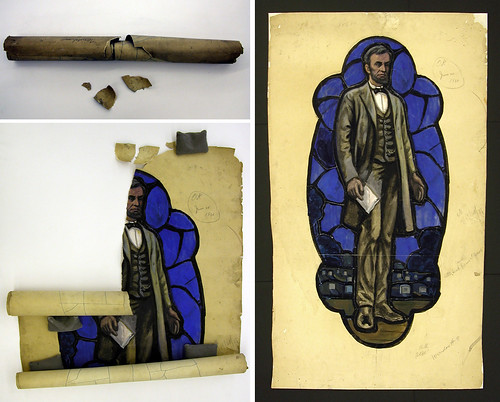
The original box (on left) of rolled drawings

The answer had to be yes, because this beat up cardboard box contained original hand drawn designs for a one of the last series of stained glass windows produced by the Louis Tiffany Studios, before they closed their doors in 1932. These windows are the focal point of the Peace Chapel in the Levere Memorial Temple, which stands as the headquarters of the Sigma Alpha Epsilon Foundation, the largest collegiate fraternity. This grimy box of drawings complete with the original Tiffany label still attached was finally dug out of the Sigma archives where it had been stored since the Temple's construction in 1930. It was clear, these items were in desperate need of repair.


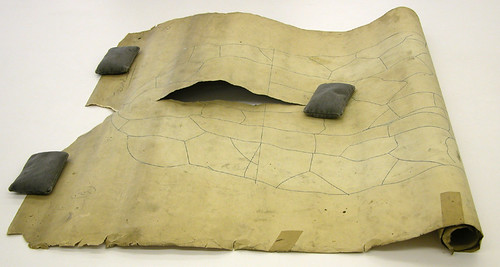
Back of one drawing unrolled as much as possible and weighted down. Tears and old tape are visible above.

Because we could not attempt unrolling them without causing damage, we were unable to perform our customary examination or treatment proposal. Our initial reports had to be made based solely on what could be examined from the exterior of the rolls, which itself was far from promising. In addition to the extensive surface dirt and brittleness, the drawings contained large tears running the width of the rolls, horizontally as well as vertically. Some old repairs had been made with a variety of poor quality tapes only adding to the overall damage and fragile state of the cartoons. We couldn't even begin to guess which drawings the hundreds of fragments matched up with. It was apparent the items would need an initial first stage of treatment before they could even be assessed.

First, we needed to gently humidify the paper in order to carefully unroll and lightly flatten the drawings to determine further treatment options. The drawings were still so dirty, they needed to have the surface dirt reduced in a series of dry cleaning treatments before they could be digitally photographed for an inventory. There were so many paper fragments, we were still unable to come up with an exact number of cartoons at the end of stage one.


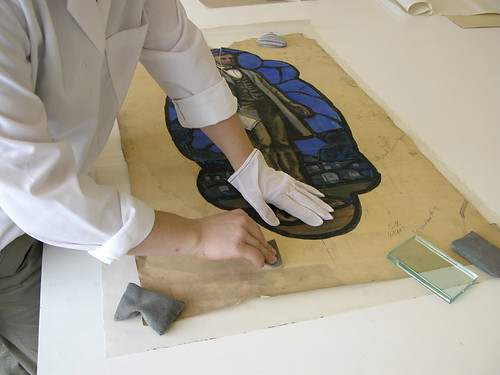
A conservator surface cleaning with a dry cleaning sponge.

It was necessary for us to examine and test the brittle cartoons to determine the second stage of treatment. Wet treatments would strengthen the paper, but presented too much risk to the delicate painted colors which tested sensitive and soluble to water. To complicate matters, areas of this delicate paint were also beginning to crack and flake which was further aggravated by even light handling.


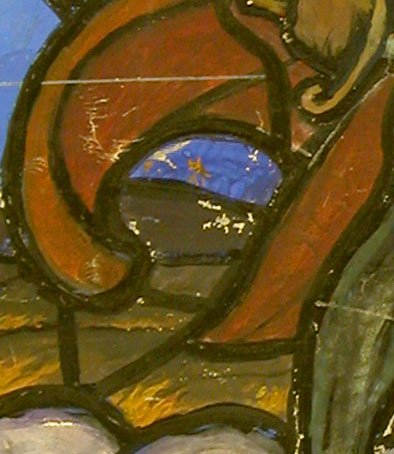
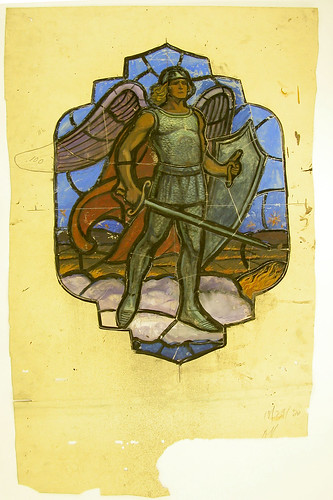
This detail of an angel drawing (full image before treatment on right) demonstrates the flaking media.

The original artists had also applied many layers of paper collage elements to the paper using very liberal amounts of what appeared to be animal hide glue. The glued collage elements were creating a pull on the paper, causing further stress and leading to tears and losses in the brittle wood pulp paper, a poor quality material to begin with which was used mainly for sketching. Originally, these drawings were only made as reference materials, with no intention of permanence.

Even the light handling of these delicate items for examination created further damage. From every direction we were faced with serious obstacles. We knew the treatment was necessary as well as nightmarish. Did we stop when presented with a challenge of this magnitude. NO!!! The gauntlet had been laid. We were itching to move forward just needing the go ahead from the client.


Drawings awaiting funding to complete stage 2 of treatment.

The project was in need of donations from members of Sigma Alpha Epsilon to move forward. To help energize fund raising efforts, we chose a single cartoon to put through the full treatments we had proposed for the group and document the process in detail. The cartoon selected for this treatment was the very iconic image of everyone's favorite president, Abraham Lincoln!


The two images on the left show the before images with the after image on the right.

The Abraham Lincoln drawing was further cleaned and all old repairs were removed. Tears were painstakingly repaired using Japanese tissue and starch paste adhesive. Losses in the paper were filled with a heavy weight Japanese tissue. The cartoon was again placed into a humidity chamber to relax before being gently flattened between wool felts. Design losses were inpainted by hand to match the surrounding areas. The Lincoln cartoon was matted with 100% buffered rag board and placed behind UV filtering plexi glass in preparation for being placed into a frame for display.


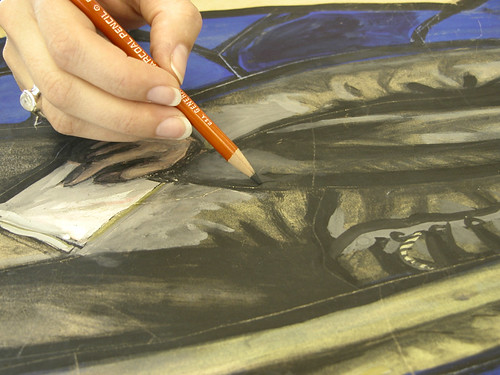
Media losses on the Lincoln drawing being filled with removable media.

The results were absolutely stunning. Over the next two years, the foundation was able to raise tens of thousands of dollars thanks in part to the persuasive efforts of Honest Abe on generous benefactors. The treatment for the remaining 68 cartoons was completed by the end of 2006.


After treatment of drawing of Vikings.

Back in 2004, when the many rolls of severely damaged paper arrived at our facility, it was unclear if the items could even be saved. It was miraculous and rewarding to see the project go from conception to completion These cartoons are now preserved to aid future generations in gaining a key insight into the execution of this wonderful and important collection of Tiffany stained glass windows.

Tuesday, March 3, 2009

Fund the Trust, Frank Lloyd Wright Needs Your Help


Everyone knows conservation is awesome! That's why we were happy to host a tour for the Frank Lloyd Wright Preservation Trust this past week. The tour, designed to energize volunteers and members, was given in an effort to kick-off the fund raising efforts for a final group of Frank Lloyd Wright prints. We love our jobs here at Graphic Conservation, so you don't have to ask us twice to spend an hour or two talking about it! We showed our guests around to the different areas of the lab, and enjoyed totally nerding out on all kinds of conservation terms and processes. Of course, no tour is complete without a brief demo and a few before and after treatment examples.


The fund raising efforts are going toward a final group of 17 plates for the FLW Preservation Trust's edition of the Wasmuth Portfolio, which is one of the few complete sets in existence. The publication of Frank Lloyd Wright's 1910 Wasmuth Portfolio, consisting of 100 plates featuring his plans and perspective of buildings from 1893-1909, gave the world it's first view of his dynamic and world changing style. Because of the beauty and desirability of these plates, many portfolios have been dismantled and sold for parts. Both the rarity and the historical importance of this complete portfolio make it one of the prizes of the Frank Lloyd Wright Preservation Trust's collection.


As many other foundations dependent on donations to fund conservation have done when dealing with huge projects, the Trust opted to break the plates up into groups allowing them to be treated incrementally over a number of years. We've been working on the conservation and preservation of these plates for over a decade and you can imagine how excited we are to have this project almost completed. The Frank Lloyd Wright Preservation Trust hope to fund this project completely by private donations. If you would like to take part in this project, please feel free to contribute today!

Interested in more information on the Wasmuth Portfolio? Check out the University of Utah's full online catalog of each plate. These look like they could use a little help from us!

Thursday, February 26, 2009

Jump Start Your Spring Cleaning!


The winter of our discontent is almost over and spring will be here soon!

To celebrate the better days ahead, Graphic Conservation wants to help kick start your spring cleaning. For a limited time only, we're offering a free storage mat an/or encapsulation package with any approved conservation treatment.

So stop feeling guilty about the rolled up artwork under the bed, and bring it in to get freshened up and placed in a safe archival storage mat for free.

Contact us for more information!

Friday, January 23, 2009

Treatment is complete, now what?

So much of the artwork we treat here has been damaged by improper materials used for framing or from poor storage choices. Because works of art on paper are extremely vulnerable to damage, the methods and materials we choose are selected carefully to promote the safety and longevity of the piece.

After conservation treatments, to ensure that the time and cost were well spent, we need to consider what the future of the art is. Will it be hung on a wall? Stored in a safe place? Or is this something meant to be viewed and handled a lot? We have various finishing options for your art that are in stride with the guidelines of the American Institute for Conservation.

Let's say that after conservation treatments that antique document of yours is probably going to be looked at quite a bit, but you're not sure if you want to have it framed, let alone figuring out just where to put it.


For something like this, we would recommend a storage mat. This will safely house the document, as well as allow for it to be handled without touching the actual object. A storage mat is a great option for long term storage if you choose not to frame the artwork. Although, if you do choose to frame it, the protective cover can be flipped to the back, providing an extra layer of archival backing.


To place artwork into a storage mat, made of 100% rag board, we would use a hinging method that is appropriate for the piece; utilizing archival materials such as Japanese tissue and wheat starch paste. In some cases, mylar corners will work best for the art. The facing mat is an important component to the storage mat, not only for being the "window" surrounding the the front of the art, but because it protects the artwork from having direct contact with the glazing material [such as plexi-glas or glass].

Another option is to have the artwork encapsulated. Encapsulation is a process in which the artwork is placed between 2 sheets of mylar, an inert plastic product, and ultrasonically welded at its edges to prevent the contact with dirt, dust, etc. Unlike lamination which is virtually impossible to reverse, encapsulated artwork is actually floating between the 2 sheets of mylar, and at any time can be reversed. The mylar can be cut at one of its edges and the artwork simply slipped out.


Encapsulation is a sound option for something like a newspaper which is delicate to begin with, but if the newspaper has fragments or is an object that will be handled a lot, the encapsulation will allow for such. This process works well for items of a double sided nature where information on both the front and back needs to be seen.

Our museum quality matting and encapsulation options have lots of variables to meet your finishing requirements. However basic or seemingly complicated those needs are, Graphic Conservation will make the best choice for the artwork.

Wednesday, December 10, 2008

Original Order Forms Found Hidden Under Hood, Important in Classic Car Appraisal

People always ask about the strangest items we've treated. The story of two horribly damaged classic car order forms always come to mind because of the odd nature of their condition and the miraculous transformation achieved during their treatment.


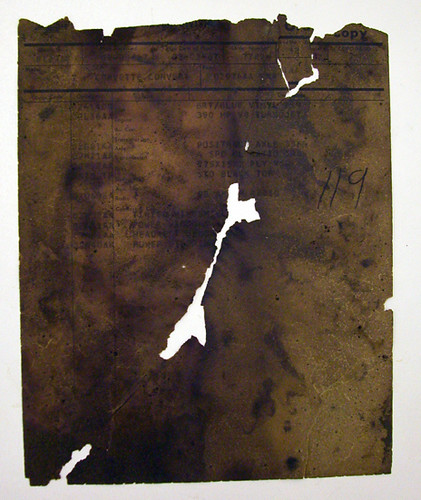
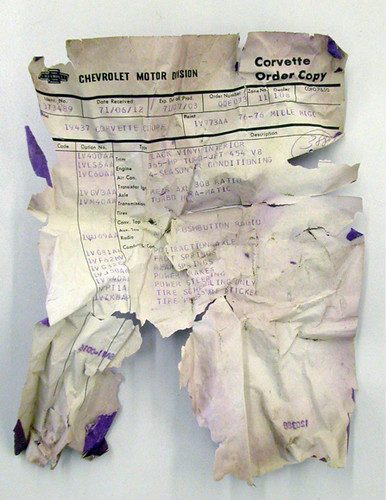
Original order forms for 1967 Corvette convertible on left and 1971 Corvette coup on right.

A private client who collects vintage Corvettes was interested in conserving two original order forms for cars he had recently purchased. The paperwork for each car had been badly handled and poorly stored. In fact, the document on the left had been found hidden within the car mechanics, where it suffered greatly from exposure to exhaust and oil residue. Both documents were so severely dessicated and brittle, they couldn't be handled without causing more fragments from breaking off.
"Original paperwork is extremely important, as it can establish how the car was ordered new, where the car was originally sold, and how the car was originally equipped. These are absolutely critical components to determining the provenance and value of a vintage Corvette." -Steve Davis, President of Barrett-Jackson Auctions, from VetteWeb.com
Due to the importance of these documents to their respective cars, our client was very eager for the stabilization of the documents which would allow for the safe viewing and handling of the information which was currently obscured by all the damage.

We started by tackling the '67 convertible paperwork to attempt the reduction of the heavy dirt layer and extensive staining due to residual grease and oil present overall.

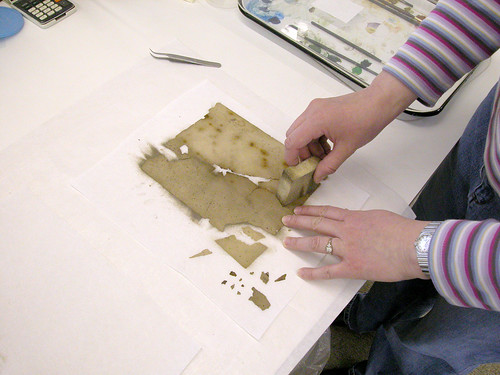
Our aqueous tests were initially unsuccessful due to the amount of grease and oil present in the document. The picture above shows how the grease and oil are preventing the absorption of water into the paper which is necessary to stabilize the fibers.


Through a series of organic solvent tests, we were able to come up with a solution which would act as a type of degreaser. With the delicate application of the solution to the item with a pipette on a suction table, we were able to greatly reduce the dark staining from the oil and exhaust residue.


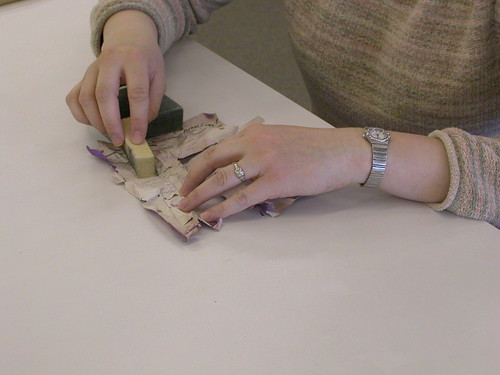
After the solvent treatments, we were then able to further reduce the exhaust residue and other surface dirt through various dry cleaning methods including the use of a dry cleaning sponge as demonstrated above and below.


At this point, we could begin treating the documents in tandem. The convertible document needed to be dry cleaned delicately because the brittle paper was prone to further tearing and fragmentation (above).


The large amount of overall damage to the documents required an overall lining to a Japanese tissue using wheat starch paste to repair tears, reinforce creases and stabilize the weak fibers of the paper.


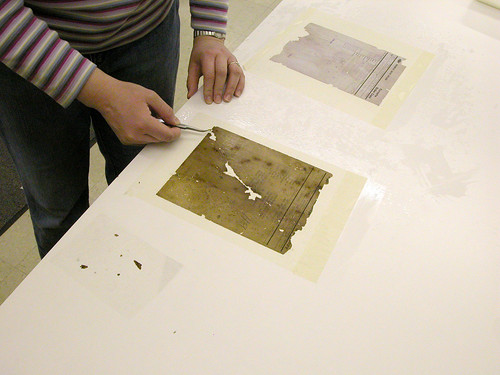
The small fragments were then hand placed with tweezers, and paper losses were filled using a matching liquid paper pulp to give a seamless appearance to the documents. The documents were then placed in a press to flatten between wool felts. Once flattened, the paper losses filled with liquid paper pulp were toned using colored pencils and watercolor to match the surrounding paper. The documents were now fully stabilized and complete.


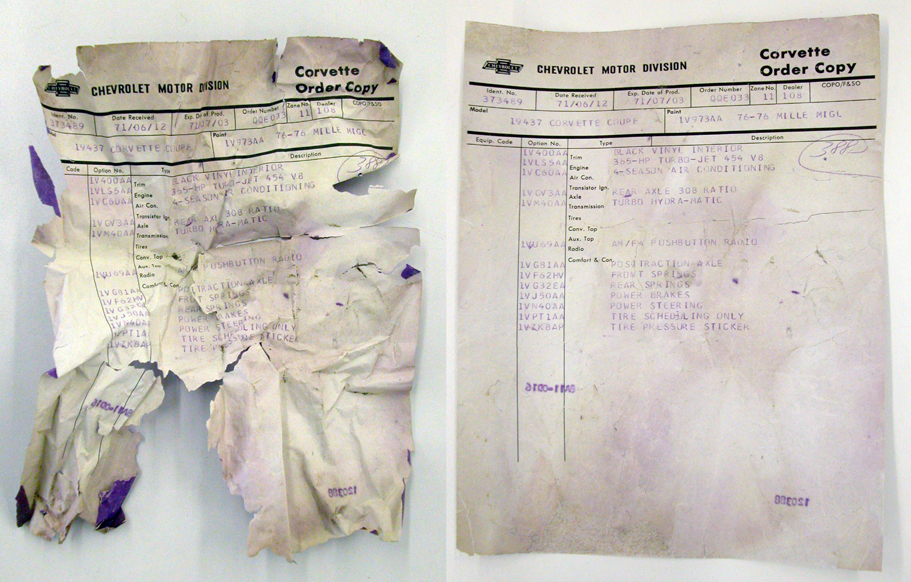
Before and after images of the original order form of a 1971 Corvette convertible


Before and after images of the original order form of a 1967 Corvette coup.

The results speak for themselves. The documents are now much stronger and can be handled safely ensuring the access to their important information as proof of provenance for these valuable classic cars.

Check out other before and after treatment images from our many other projects!